Posts Tagged ‘coconut curling cream’
My FIRST Henna Application
Posted on: September 30, 2012
YAY! I’m officially a henna head 🙂
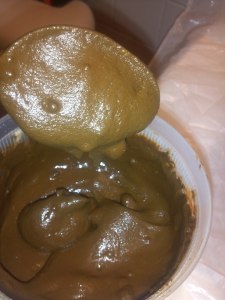
I was so nervous and did SO much research before I decided to do this, and then even more research to figure out the best way to mix up my henna. I’ve never had ANY kind of color in my hair before..ever. So, this is my very first experience not just with henna, but with hair color in general. I had no idea how my hair would react to color, how fast or how much color would take..NONE of that lol. After reading several articles, this is what I decided to include in my henna mixture:
—
1. 150 grams Jamila Henna
2. Trader Joe’s Tea Tree Tingle Conditioner (I didn’t measure)
3. Cantu Coconut Curling Cream (Didn’t measure this either..)
4. 2 TBSP Amla powder
5. 2 cups warm green tea
6. In order for the dye in the henna powder to release, your mixture has to be slightly acidic. I read that the mixture would turn a certain color when the dye has released. When I didn’t see my dye color changing, I got nervous, so decided to add more acid-a few drops of lime juice.
—
I ordered from HennaSooq.com. They even included information on how to apply henna in the package, which I thought was great!
I wanted the mixture to be as moisturizing as possible, which is why I added the conditioners. I also added Amla just because I’d heard good things about its moisturizing properties. I was nervous about if the dye had released in my mixture (I let it sit overnight). So, I came across this GREAT tip to test your dye! –> Take a dab of the henna mix and place it in the palm of your hand. Let it sit for 5 minutes and rinse it off. If you have an orange stain where the henna was, then your dye has released and the henna is ready! I did this and it worked like a charm.
Because this was my first experience with color, I did an overnight strand test. I just took a few clean strands of hair and applied the henna mixture to them, and placed them in a ziplock bag overnight. The next morning, I rinsed out the henna and checked for how the hair reacted. There was no noticeable color change, so I knew I was good to go and that my hair wouldn’t come out some crazy orange-y color lol.
SO..finally I applied my henna. I’d read applying it could get very messy, so I taped plastic bags over my sink in my bathroom to protect my sink from splatters. But, while applying it, it actually wasn’t very messy for me at all. Maybe that’s because my mixture was very thick and goupy. Anyway, applying was pretty easy. I did it in four sections with an applicator brush. I left it in for about 8 hours. My only GRIPE about henna…is the SMELL!!! OMG..it’s not that bad at first, but after smelling it for an hour or so, it was horrible..*gag*
Anyway, rinsing it out wasn’t hard..but it took a long time, if that makes sense. I rinsed my hair in the tub, and the henna was rinsing out easily, but I guess there was so much of it that it required a LOT of rinses. I rinsed with just water for about 20 minutes. Then, I co-washed 3 times. After that, I deep conditioned overnight. When I rinsed out the next day, there was STILL henna coming out of my hair. But, the results were GREAT. I noticed a SLIGHT reddish tint on my hair, which is all I wanted, so I”m satisfied! It’s hard for anyone else to notice, but I see it lol.
My hair wasn’t dried out or difficult to manage afterward. It’s actually pretty much the same as before. So, I love it and I’m pleased with the results. I may henna again in the future!


